With the Christmas holidays coming up fast, I've been busy with decorating, shopping and planning a Christmas open house for Dec. 20th, so I haven't been able to write much in my blog this month.
One of my many holiday "duties" is cookie baking. I don't think it's properly the holidays until the house is filled with the aroma of baking. I thought I'd share one of my favorite cookie recipes here. This cookie would be perfect for any occasion, but I traditionally make them at Christmas and they are always very popular. If you love chocolate, and love cherries....this cookie is for you!
Buried Cherry Cookies
1/2 cup butter
1 cup sugar
1 egg
1 1/2 tsp vanilla
1 1/2 cups flour
1/2 cup unsweetened cocoa powder
1/4 tsp baking soda
1/2 tsp baking powder
1/4 tsp salt
1 10 ounce jar (about 48) maraschino cherries
6 oz (1 cup) semi-sweet chocolate chips
1/2 cup Eagle brand sweetened condensed milk
In a large bowl, cream butter. Add sugar and beat until fluffy. Add egg and vanilla and mix well. Combine flour, cocoa powder, baking soda, baking powder and salt and gradually add to butter mixture, beating well. Chill dough if necessary for easy handling. Shape into 1 " balls and place about 2 inches apart on ungreased cookie sheets. Make a deep thumbprint in the center of each ball.
Drain cherries , reserving juice. Place a cherry in each thumbprint. In a small saucepan, combine chocolate chips and the condensed milk and stir over low heat until chocolate is melted. Stir in 4 tsp. reserved cherry juice. Spoon 1 tsp of frosting over each cherry, covering it completely. Bake at 350 degrees for about 10 minutes, until edges are firm. Makes about 48.
** I use parchment paper on my cookie sheets for ease in removal. Also, the first time I made the chocolate frosting, it was a little thin. The second time I made it, I didn't use 4 tsp of cherry juice; I used about 2 or 3 tsp and let the mixture cool for a few minutes to thicken before spooning over the cherry. It seemed to work better this way. Also, there will be frosting left over, so I saved it in a tupperware container in the refrigerator and re-used it a few days later when I decided to make another batch of cookies. I just re-heated the frosting in a small saucepan.***
Enjoy!!!

Wednesday, December 10, 2008
Wednesday, November 5, 2008
Vintage Voice: Tiffany Girls

Louis Comfort Tiffany's (1848-1933) designs have long been renowned for their artistry and fine attention to detail. Although many such pieces bear his name and represent his vision, he was not the sole force behind the creative process. Many people worked for him without receiving much recognition and one such person was Clara Driscoll.
Specializing in architectural decoration at the Metropolitan Museum Art School in New York City, Driscoll began her career with Tiffany Glass Co.(incorporated in1885) at the age of 26. Tiffany only employed un-married women and widows, so Driscoll left three times due to engagements and marriages, but during her three stints with the firm, she became one of the company's best designers. Her talent for designing the signature leaded-glass lampshades, bases and desk sets was evident in some of her most famous models, including the Dragonfly, Wisteria and Poppy designs.
The women she directed also played key roles in the company's success. At her prime, Driscoll managed 35 women in the women's glass-cutting department. The "Tiffany Girls" were well-suited for this type of work, with their nimble fingers, eye for detail and a penchant for decoration. Many of Tiffany's designs benefitted from a woman's touch. However, they were no strangers to the physical demands, particularly once they were able to cut their own glass.
Unfortunately, Driscoll's dedication and talent went largely un-noticed and the success of her designs resulted in resentment among co-workers. She endured many attempts by male workers to close her department, but she ultimately triumphed. Though forced to limit her staff, she was able to design all the lampshades and small luxury goods, including some windows and mosiacs.
Driscoll worked closely with Louis Tiffany, who was keenly aware of her capabilities and supported her decisions on both design and management matters. Her sensibilities extended beyond the studio; she felt very strongly about the condition of her female employees. Because they had to leave once they were married, Driscoll was always frustrated to lose workers, but even more so when they sacrificed their careers and salaries for less successful husbands. Ultimately, she too decided to end her employment and marry.
If you would like to read more about the Tiffany Girls, you can do so in the book, A New Light on Tiffany: Clara Driscoll and the Tiffany Girls, by Martin Eidelberg, Nina Gray and Margaret K. Hofer.
Monday, October 20, 2008
Painting Project Update: Final
Transforming the formal parlor from blah to Victorian splendor!
Before photos: Dark blue and light blue walls.


Mid- painting:


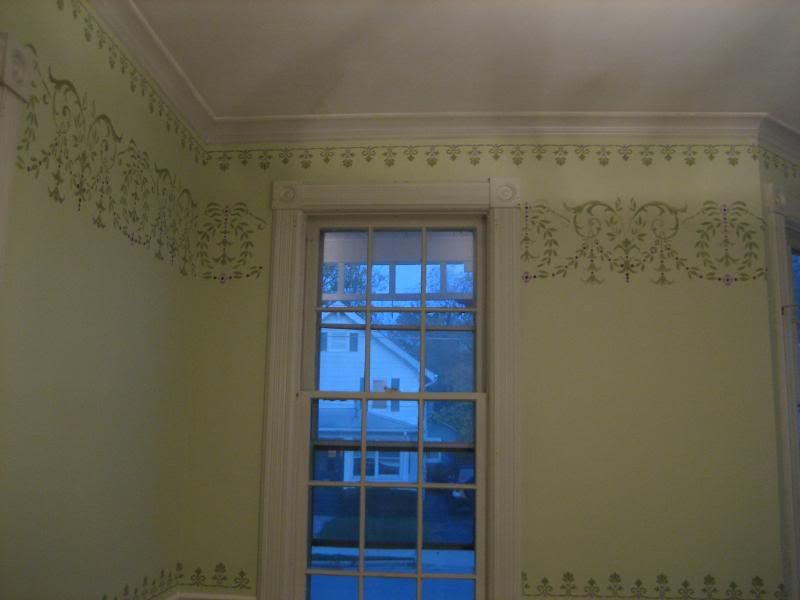
After painting walls new colors (Honeydew, top, and Great Green, bottom.) Stenciling Phase 1:
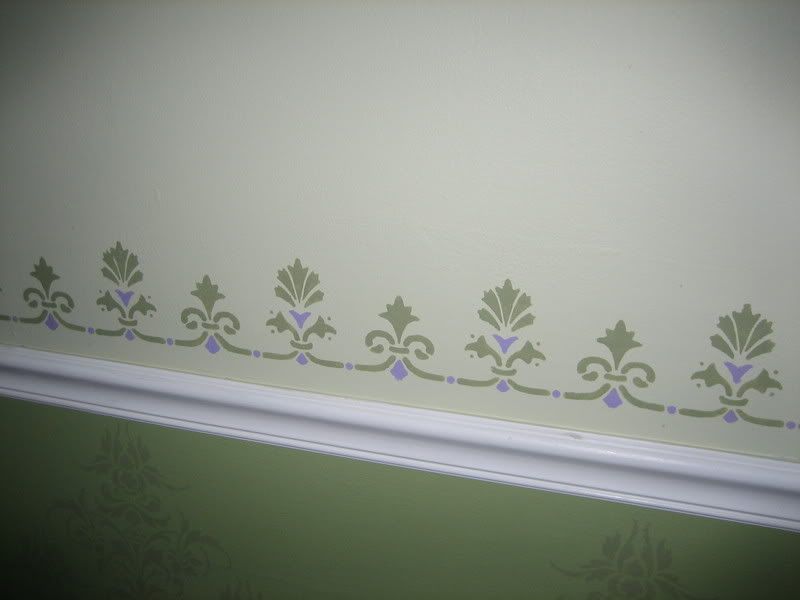
Border along chair rail

Stenciling Phase 2:
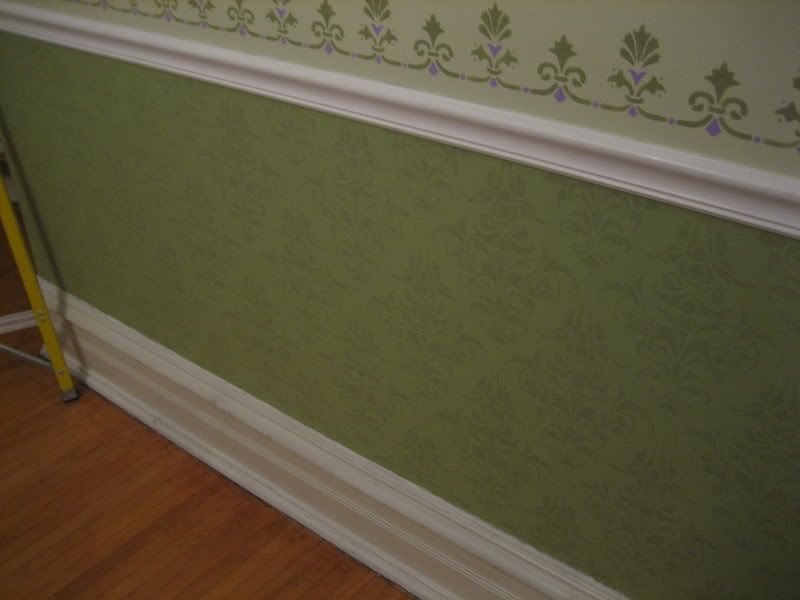
All-over damask pattern on wall below chair rail

Stenciling Phase 2.5:
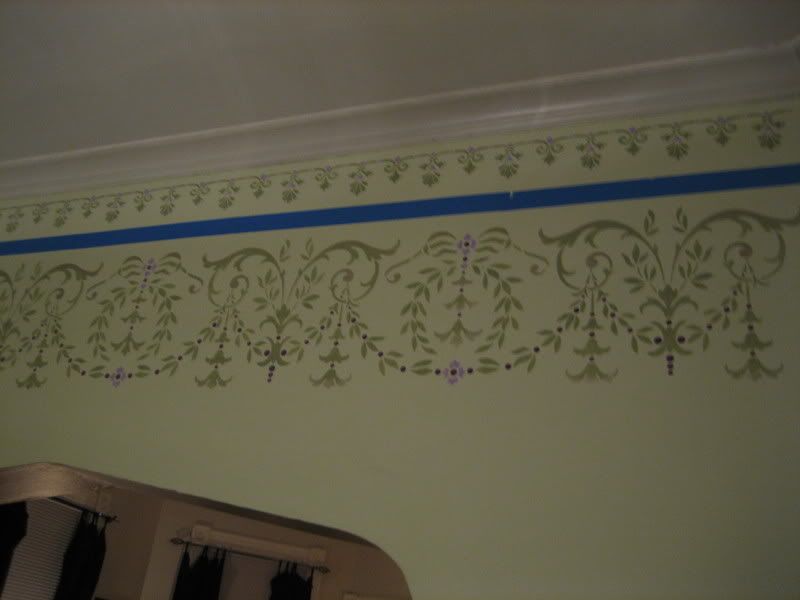
Inverted border along molding at the ceiling

Stenciling Phase 3: Dado

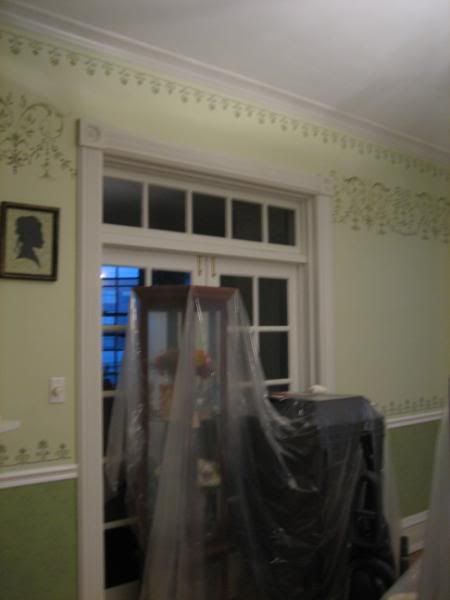
Final Pictures: DONE!


Before photos: Dark blue and light blue walls.


Mid- painting:


After painting walls new colors (Honeydew, top, and Great Green, bottom.)
 Stenciling Phase 1:
Border along chair rail
Stenciling Phase 2:
All-over damask pattern on wall below chair rail
Stenciling Phase 2.5:
Inverted border along molding at the ceiling

Stenciling Phase 3: Dado
Final Pictures: DONE!


Food: Halloween Cupcakes

In the spirit of the upcoming Halloween 'holiday', I made some Halloween cupcakes to take to work for a treat. These are just plain chocolate cupcakes with powdered sugar on top. I used mini stencils purchased from the Martha Stewart craft line at Michael's. Colored sugars, food coloring spray or cocoa powder could also be used.
Thursday, October 16, 2008
Vintage Voice: The First Electric Christmas Tree
In 1882 the first Christmas tree with electric lights was displayed in a Victorian home in downtown New York City. The homeowner was Edward Johnson, a vice president of the Edison Electric Light Company. Mr. Johnson did not approve of the wax candle trees that were popular at that time because of how dangerous they could be and how many serious fires they caused. Electricity was new and people were just becoming acquainted with it. He figured a tree with electric lights would be a lot safer, so he decided to devise electric lights for his own tree and display it in his home.
Mr. Johnson's innovative idea was not deemed newsworthy by the media, however, despite all the letters he mailed off to every single newspaper in the city. He invited the reporters to visit his home and view the tree, but not one member of the New York press showed up. In his letter, Johnson wrote, "Wax candle trees can only be lighted for an hour per night and must be watched carefully during that time. The chances of fire are great. Our electric tree will prove to be much safer and be kept glowing for several hours without fear of causing a blaze."
Johnson had worked with Thomas Edison, who had invented the light bulb only three years earlier. Naturally, he was upset when the New York press showed no interest in his electric tree. Fortunately, one reporter did show up. He happened to be a reporter from Michigan who was in New York visiting relatives during Christmas of 1882 and his name was Thomas Croffut.
Croffut sent back a story about the tree to his newspaper, the Detroit Post and Tribune. He wrote, in part, "I walked over beyond Fifth Avenue and called at the residence of Edward H. Johnson, vice president of Edison Electric Light Co. There, at the rear of the beautiful parlor, was a large Christmas tree presenting a most picturesque and uncanny aspect. It was brilliantly lighted by many colored globes about as large as an English walnut and was turning some six times a minute on a little pin box. There were about eighty lights on the tree. I need not tell you that the scintillating tree was a pretty sight; one can hardly imagine anything prettier."
Though he was ignored by newspapers in his own town, Johnson did not give up. He placed an ad in all of them, inviting New Yorkers to visit his home during the holiday season. Hundreds did and the idea of having an electric tree, instead of a wax candle one, soon became all the rage.
Tuesday, October 14, 2008
Food Facts: Molasses
I thought I'd add this little bit about molasses, since it is used in my Spiced Hermit recipe below.
It's hard to imagine, but molasses was once used as commonly in cooking as sugar is today. Up until about the 1920s, it was the sweetener of choice for all sorts of dishes, from cornmeal pudding to steamed bread. The sweetest variety of molasses comes from the sugarcane juice that's simply been reduced to syrup. As the syrup is boiled further, sugar crystals form and are removed in stages, with the resulting molasses becoming darker and less sweet. The darkest and least-sweet kind of molasses is blackstrap. Though blackstrap can be used in my Spiced Hermit recipe, I recommend, for better flavor, a medium-dark variety with no sugar removed, like Grandma's Original Molasses.
It's hard to imagine, but molasses was once used as commonly in cooking as sugar is today. Up until about the 1920s, it was the sweetener of choice for all sorts of dishes, from cornmeal pudding to steamed bread. The sweetest variety of molasses comes from the sugarcane juice that's simply been reduced to syrup. As the syrup is boiled further, sugar crystals form and are removed in stages, with the resulting molasses becoming darker and less sweet. The darkest and least-sweet kind of molasses is blackstrap. Though blackstrap can be used in my Spiced Hermit recipe, I recommend, for better flavor, a medium-dark variety with no sugar removed, like Grandma's Original Molasses.
Food: Spiced Hermits
What, you may ask, is a spiced hermit?? It is actually a delicious little chewy dessert bar or cookie. I found a recipe for them recently and also learned about their curious history. Apparently, in colonial times, sailor's wives made spiced hermits as a going-away treat for their husbands when they were leaving port and going out to sea. The chewy spiced treats were sealed into tins and would keep for several weeks this way. Because they were kept sealed in the tins, like their own 'home', they were nicknamed hermits.
The recipe sounded similar to molasses cookies or gingerbread, and I thought it would make a delicious autumnal treat and even a good one for the Christmas holidays as well. In some recipes they are made like cookies, in this one, they are cut into small bars. An added twist to the spiced hermit is the addition of 3/4 c of chopped candied cherries.
Spiced Hermits
Ingredients:
2 c flour (plus a little extra)
3/4 tsp ground cinnamon
3/4 tsp ground ginger
1/2 tsp ground nutmeg
1/8 tsp ground cloves
3/4 tsp baking soda
3/4 tsp baking powder
1/2 c butter (1 stick) at room temperature
1- 1/4 c packed light brown sugar
1 large egg plus 1 egg yolk
3 tblsp old fashioned molasses ( not blackstrap)
1 1/2 tsp vanilla extract
3/4 c finely chopped walnuts
1/2 c dark raisins or currants
For egg glaze:
1 egg, beaten with 1 tsp water
Get out 1 or 2 large heavy cookie sheets. (Just one sheet will be in the oven at a time, but having two sheets will streamline the baking). Cut a piece of parchment paper to fit each cookie sheet, then cut those in half, lengthwise. You should end up with 4 rectangular pcs of parchment.
Heat oven to 375 degrees.
Sift flour, all of the spices, baking powder and baking soda into a medium-sized mixing bowl and set aside.
In a separate large bowl, use an electric mixer for a few seconds to soften the butter. Add the brown sugar to the butter roughly in thirds, beating at medium-high for 1 minute after each addition. Add the egg and the yolk and beat another minute. Add the molasses and the vanilla and beat for 1 more minute, until the batter is smooth.
Using a wooden spoon, stir in 1 cup of the dry ingredients into the creamed ingredients. Stir in the walnuts and raisins/currants. Add the remaining dry mixture a half cup at a time and stir after each addition. The dough should end up very dense and hard to stir. If it seems too soft, mix in another 1-2 tblsp of flour. Turn out the dough onto a floured surface and divide into 4 equal pieces.

Here is two pieces of the divided dough. The dough smells very much like gingerbread.
Working with well floured hands, roll the first ball into a log about 12 inches long. Place the log onto one of the pieces of parchment. Place the log lengthwise onto the cookie sheet, leaving room for a second one beside it. Slightly flatten the log into a rough rectangle so the dough is about 3/4 inches thick and 1 1/4 inches wide.

Here are 2 logs on a cookie sheet, flattened and glazed with the egg glaze, ready for the oven.
Repeat the rolling steps for a second piece of dough, then use a piece of parchment to place the 2nd log on the cookie sheet (as picture above.) Also slightly flatten the second piece. Using a pastry brush, paint both bars with the egg glaze. This will give the bars a nice, shiny finish.
Bake the bars in the center oven rack for 11-12 minutes. (I baked mine for about 14 minutes since my oven seems to take longer to cook things.) While the first set are cooking, prepare the other two pieces of dough like the first ones and place them on the second cookie sheet.
When the bars are done baking, they will have flattened out somewhat. They might seem a little squishy and underdone, but that's okay. They'll continue to cook a little longer and will get firmer as they cool.
Place the baking sheet on a cooling rack and let cool for about 10 minutes. Then, lift the parchment pieces with the cooked bars and place them onto a large cutting board.
 Baked bars, before cutting.
While the bars are still warm, cut them into 1 1/2 inch wide sections with a pizza cutter or a sharp, serrated knife. Cool the hermits thoroughly, then store them in an airtight container.
Makes about 32 hermits.
 Spiced Hermits, cut into pieces and ready to eat!
Mangia!
The recipe sounded similar to molasses cookies or gingerbread, and I thought it would make a delicious autumnal treat and even a good one for the Christmas holidays as well. In some recipes they are made like cookies, in this one, they are cut into small bars. An added twist to the spiced hermit is the addition of 3/4 c of chopped candied cherries.
Spiced Hermits
Ingredients:
2 c flour (plus a little extra)
3/4 tsp ground cinnamon
3/4 tsp ground ginger
1/2 tsp ground nutmeg
1/8 tsp ground cloves
3/4 tsp baking soda
3/4 tsp baking powder
1/2 c butter (1 stick) at room temperature
1- 1/4 c packed light brown sugar
1 large egg plus 1 egg yolk
3 tblsp old fashioned molasses ( not blackstrap)
1 1/2 tsp vanilla extract
3/4 c finely chopped walnuts
1/2 c dark raisins or currants
For egg glaze:
1 egg, beaten with 1 tsp water
Get out 1 or 2 large heavy cookie sheets. (Just one sheet will be in the oven at a time, but having two sheets will streamline the baking). Cut a piece of parchment paper to fit each cookie sheet, then cut those in half, lengthwise. You should end up with 4 rectangular pcs of parchment.
Heat oven to 375 degrees.
Sift flour, all of the spices, baking powder and baking soda into a medium-sized mixing bowl and set aside.
In a separate large bowl, use an electric mixer for a few seconds to soften the butter. Add the brown sugar to the butter roughly in thirds, beating at medium-high for 1 minute after each addition. Add the egg and the yolk and beat another minute. Add the molasses and the vanilla and beat for 1 more minute, until the batter is smooth.
Using a wooden spoon, stir in 1 cup of the dry ingredients into the creamed ingredients. Stir in the walnuts and raisins/currants. Add the remaining dry mixture a half cup at a time and stir after each addition. The dough should end up very dense and hard to stir. If it seems too soft, mix in another 1-2 tblsp of flour. Turn out the dough onto a floured surface and divide into 4 equal pieces.

Here is two pieces of the divided dough. The dough smells very much like gingerbread.
Working with well floured hands, roll the first ball into a log about 12 inches long. Place the log onto one of the pieces of parchment. Place the log lengthwise onto the cookie sheet, leaving room for a second one beside it. Slightly flatten the log into a rough rectangle so the dough is about 3/4 inches thick and 1 1/4 inches wide.
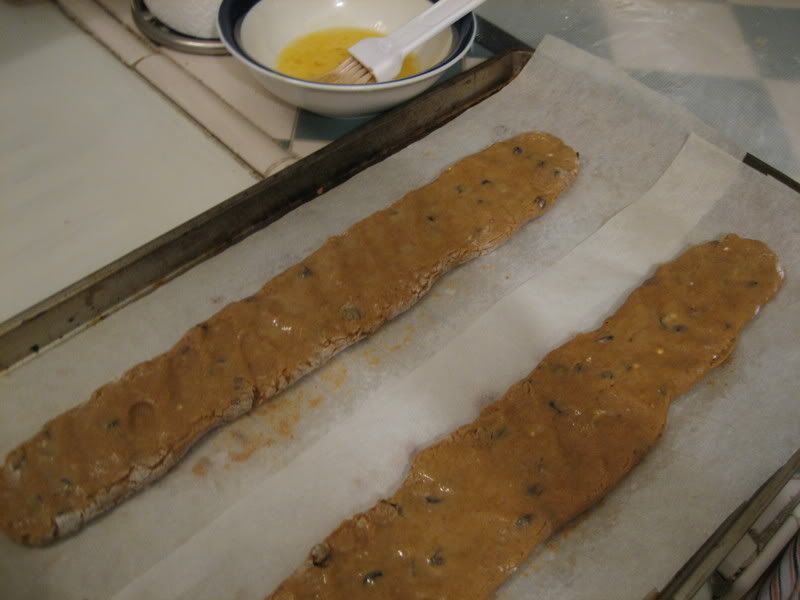
Here are 2 logs on a cookie sheet, flattened and glazed with the egg glaze, ready for the oven.
Repeat the rolling steps for a second piece of dough, then use a piece of parchment to place the 2nd log on the cookie sheet (as picture above.) Also slightly flatten the second piece. Using a pastry brush, paint both bars with the egg glaze. This will give the bars a nice, shiny finish.
Bake the bars in the center oven rack for 11-12 minutes. (I baked mine for about 14 minutes since my oven seems to take longer to cook things.) While the first set are cooking, prepare the other two pieces of dough like the first ones and place them on the second cookie sheet.
When the bars are done baking, they will have flattened out somewhat. They might seem a little squishy and underdone, but that's okay. They'll continue to cook a little longer and will get firmer as they cool.
Place the baking sheet on a cooling rack and let cool for about 10 minutes. Then, lift the parchment pieces with the cooked bars and place them onto a large cutting board.
 Baked bars, before cutting.
While the bars are still warm, cut them into 1 1/2 inch wide sections with a pizza cutter or a sharp, serrated knife. Cool the hermits thoroughly, then store them in an airtight container.
Makes about 32 hermits.
 Spiced Hermits, cut into pieces and ready to eat!
Mangia!
Wednesday, September 17, 2008
Food: Cornbread
With the chilly weather of autumn upon us, I start looking for great recipes for hearty soups and other tummy-warming foods. I recently made some chili-spaghetti (a combination of chili and spaghetti) and decided to make some warm cornbread to go with it. I had several recipes for cornbread that I had tried in the past which did not appeal to me, so I went into my Good Housekeeping Illustrated Cookbook, which had been a gift from my mother for my 21st birthday back in 1991 and was really my first cookbook. Of course, I found a simple and delicious recipe in there that was just what I wanted!
Corn Bread
1 c. all purpose flour
3/4 cup cornmeal (Bob's Red Mill coarse ground cornmeal is my favorite!)
2 to 4 tbls. sugar (I used 3, which was just enough to sweeten slightly, but not too much!)
1 tbls double-acting baking powder
1 tsp salt
1 egg
2/3 c milk
1/3 c butter, melted
Preheat oven to 425. Grease an 8x8 baking pan. In a medium bowl, with a fork, mix flour, cornmeal, sugar, baking soda and salt. In a small bowl, beat together egg, milk and butter with a fork or whisk. Pour egg mixture all at once into flour mixture. Stir just until flour is moistened and quickly pour batter into prepared pan. Spread batter evenly, and bake for 25 minutes or until golden. Cut into squares to serve.
To make Blueberry Corn Muffins:
Grease sixteen muffin-pan cups. Prepare as above, but add to flour mixture 1 cup of fresh or forzen un-sweetened blueberries. Spoon batter into muffin-pan cups, filling each 2/3 full. Bake 20 minutes.
Tuesday, August 26, 2008
Today's Spotlight On: My new chairs

Kudos to my dad for making these exquisite Adirondack chairs!
My father, who is semi-retired, loves to work with wood and he has the biggest and most elaborately outfitted woodworking shop that I've ever seen. He's always looking for new projects to do and recently he asked myself and my siblings if we might be interested in Adirondack chairs. I gave a resounding "heck, yeah!". I have long admired these types of chairs. Not only do they have a timeless appeal and beauty, but they are very comfortable. He asked me how many I wanted and I asked for two. I didn't know he'd be able to make them so quickly! He confessed to me when he dropped these off that he made 15....now I wish I had asked for more of them!
Now my only dilemma is whether I want to stain them or paint them!
Monday, July 7, 2008
Spotlight On: Painting Pt. 2
 The Painting Continues!
Bottom part of the wall completed.
Here we see the top part of the wall being painted. We started by cutting in around all the trim using a 2 inch angled brush. After that, it was all about the roller, baby!
In the other pic we can see E happily (and I use the term lightly here) rolling away.


After:
I tried to take the pictures in different lighting so that the color of the paint would appear as true as possible. I think these show the bottom color great, but the top looks very yellow-ish in the photos, but it is definitely not that yellow looking. It is a very light green (pretty much the same color as a ripe honeydew melon, which is actually the color name as well). We used Sherwin-Williams paint. Color on the bottom part of the wall is Great Green and on the top is Honeydew (of course!). Now, I just have to await the arrival of my stencils so I can start on that phase of the project!


Sunday, June 29, 2008
Today's Spotlight On: Painting
I have finally gotten around to starting a painting project which was supposed to have been done this last winter. I bought most of the stuff I needed in March, but for whatever reason, it never got done. I suppose, there were probably other things that got in the way; there always is!

This is a photo I took right after we moved in. The previous owners had painted the walls in two shades of blue, both of which I found particularly dull and so not to my taste. The white chair rail was also installed by them. The rest of the room has it's original molding around the doors and windows and the original baseboards, but if there was a chair rail originally in this room, it has been long gone.
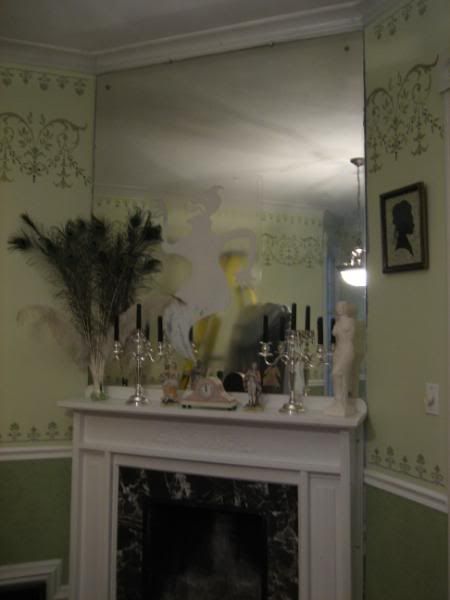
The previous owners had some furniture in this room, but no window treatments. The furniture consisted of dark blue denim couches, a coffee table and a rug. Denim couches? Seriously? I can't think of anything more putrescent and 1980's than denim couches. Oddly, there was also a baby changing table in the corner of the room also. (They had a baby, but why you'd want a changing table in your living room, I do not know.) Some of my antique furniture was placed in this room and some other decorative items on the mantel, but I didn't do much else with it because we knew we'd need to change the color. We considered wallpaper and had even gone so far as to have a professional wallpaper-hanger who has worked on other Victorian houses in the area come take a look at the room.
We found a gorgeous reproduction room-set by Bradbury & Bradbury also, but the cost deterred us. Bradbury & Bradbury http://www.bradbury.com/victorian/victorian.html makes hand-printed silk wallpapers; many of which are authentic reproductions of patterns that were popular during the Victorian era by the premiere designers of the time, such as Walter Crane, William Morris, Herter Brothers and Dresser.
But, it's not cheap to buy and near impossible to hang yourself. If you want it to look right, you need to have a professional who has experience hanging Victorian wall paper.
Someday, we still plan to have this done, when we have more money to spend. For now, we decided our next best thing would be to paint the room and use a Victorian style stencil to create patterns similar to the art wallpapers that were so in fashion. This is a subterfuge which has been used successfully by other folks in the same situation as us. I have seen some great Victorian room examples of this in several issues of my favorite magazine, Victorian Homes.
 To the left is room-set from the Christopher Dresser collection from Bradbury & Bradbury.
I could spend years trying to replicate this by stenciling, but I don't really want to do that. I'll go for a more simple approach until we can afford to buy the paper and have it hung professionally in the future.
Right now, this is how the drawing room looks. I have moved the furniture to the center of the room, draped everything, including the fireplace mantel and mirror. Switchplates have been removed and masked. I have washed the walls and molding with a solution of warm water and dishsoap. We had not hung anything on the walls, so there are no nail holes to fill or sand. ( The previous owners had pictures etc in the room, but amazingly, they did cover up all the nail holes they made and san ded them smooth and then painted over the spots.)
After washing the walls, I used some silicone caulk to fill in the gaps that had been left between the wall and the chair rail that the previous owners had installed. There were a few areas around some of the molding around the French doors and the fireplace mantel where there were small gaps also. I filled in the gaps using a small bead of caulk, then used a wet finger to press it into the gaps and make a crisp edge. The chair rail now looks much better and almost as if it has been there all along, rather than some sloppily installed modern addition. This will also make it easier for me when I paint around the molding.
Once the caulk dries, I will again be washing the walls with a solution called Jasco TSP No-Rinse Substitute. This is basically a preparation solution used to clean, de-grease, and de-gloss painted surfaces prior to re-painting. It has been recommended in many articles and home improvement books and by professional painters to really give you a clean and dull surface to paint over, which gives much better, professional-looking results.
Tomorrow, I will begin masking the baseboard and priming the lower part of the wall. I'm using a light green color palette in this room and because the lower part of the wall is very dark, I will have to prime that part of the wall first. I think I might be okay with the top part, which is much lighter.

This is a photo I took right after we moved in. The previous owners had painted the walls in two shades of blue, both of which I found particularly dull and so not to my taste. The white chair rail was also installed by them. The rest of the room has it's original molding around the doors and windows and the original baseboards, but if there was a chair rail originally in this room, it has been long gone.
The previous owners had some furniture in this room, but no window treatments. The furniture consisted of dark blue denim couches, a coffee table and a rug. Denim couches? Seriously? I can't think of anything more putrescent and 1980's than denim couches. Oddly, there was also a baby changing table in the corner of the room also. (They had a baby, but why you'd want a changing table in your living room, I do not know.) Some of my antique furniture was placed in this room and some other decorative items on the mantel, but I didn't do much else with it because we knew we'd need to change the color. We considered wallpaper and had even gone so far as to have a professional wallpaper-hanger who has worked on other Victorian houses in the area come take a look at the room.
We found a gorgeous reproduction room-set by Bradbury & Bradbury also, but the cost deterred us. Bradbury & Bradbury http://www.bradbury.com/victorian/victorian.html makes hand-printed silk wallpapers; many of which are authentic reproductions of patterns that were popular during the Victorian era by the premiere designers of the time, such as Walter Crane, William Morris, Herter Brothers and Dresser.
But, it's not cheap to buy and near impossible to hang yourself. If you want it to look right, you need to have a professional who has experience hanging Victorian wall paper.
Someday, we still plan to have this done, when we have more money to spend. For now, we decided our next best thing would be to paint the room and use a Victorian style stencil to create patterns similar to the art wallpapers that were so in fashion. This is a subterfuge which has been used successfully by other folks in the same situation as us. I have seen some great Victorian room examples of this in several issues of my favorite magazine, Victorian Homes.
 To the left is room-set from the Christopher Dresser collection from Bradbury & Bradbury.
I could spend years trying to replicate this by stenciling, but I don't really want to do that. I'll go for a more simple approach until we can afford to buy the paper and have it hung professionally in the future.
Right now, this is how the drawing room looks. I have moved the furniture to the center of the room, draped everything, including the fireplace mantel and mirror. Switchplates have been removed and masked. I have washed the walls and molding with a solution of warm water and dishsoap. We had not hung anything on the walls, so there are no nail holes to fill or sand. ( The previous owners had pictures etc in the room, but amazingly, they did cover up all the nail holes they made and san
 ded them smooth and then painted over the spots.)
After washing the walls, I used some silicone caulk to fill in the gaps that had been left between the wall and the chair rail that the previous owners had installed. There were a few areas around some of the molding around the French doors and the fireplace mantel where there were small gaps also. I filled in the gaps using a small bead of caulk, then used a wet finger to press it into the gaps and make a crisp edge. The chair rail now looks much better and almost as if it has been there all along, rather than some sloppily installed modern addition. This will also make it easier for me when I paint around the molding.
Once the caulk dries, I will again be washing the walls with a solution called Jasco TSP No-Rinse Substitute. This is basically a preparation solution used to clean, de-grease, and de-gloss painted surfaces prior to re-painting. It has been recommended in many articles and home improvement books and by professional painters to really give you a clean and dull surface to paint over, which gives much better, professional-looking results.
Tomorrow, I will begin masking the baseboard and priming the lower part of the wall. I'm using a light green color palette in this room and because the lower part of the wall is very dark, I will have to prime that part of the wall first. I think I might be okay with the top part, which is much lighter.
Subscribe to:
Posts (Atom)